Chapter 2 Local deployment
Chapter guide: Chapter 1 settled what Langfuse is, and what it can do for the three roles of testing, operations engineering, and operations. This chapter answers how to get it running. Our running example, "售后助手" ("After-sales Assistant"), has to produce a trace, and the first step is a Langfuse instance of your own. This book chooses Docker Compose self-hosting: deploy the six-container stack on a local machine, register an administrator, create the organization
yubing-organd the projectafter-sales, get the project API key, and clear the path for the first trace in Chapter 3. The chapter runs along four lines. Architecture: first build the map that the deployment unit is six containers. Configuration: walk the compose file section by section, and the.envsecret list. Start and verification: the deployment is complete only when the health check passes. Initialization: from UI registration to the critical minute when the API key is shown only once. Every operation and every troubleshooting step comes from a Langfuse v4.76.0 deployment on a local machine on 2026-11-08, confirmed in testing. By the end of this chapter, you can finish a six-container deployment whose health check passes; say which container each of the three kinds of data lands in; walk the whole flow from registration to the API key; and match four common failures to their records.
Docker and Compose v2 are ready
Reserve disk for a 4-8 GB first pull"] --> B["Get the compose file (Section 2.2)
docker-compose.yml from the official repo
Registry docker.langfuse.com"] B --> C["Configure .env secrets (Section 2.2)
Three secrets from openssl rand
DATABASE_URL and POSTGRES_PASSWORD share one value"] C --> D["Start the six containers (Section 2.3)
docker compose up -d
If 3000 is taken, move to 3001"] D --> E["Health verification (Section 2.3)
GET /api/public/health
Returns status OK and the version"] E --> F["Register in the UI (Section 2.4)
Sign up, then Skip the subscription page
Registration creates the first account"] F --> G["Create the org and project (Section 2.4)
New Organization, then the project
Land on the project Traces page"] G --> H["Create an API key (Section 2.4)
Settings, then API Keys
pk-lf- / sk-lf- shown only once"]
Flow of the operations in this chapter
When you need it
Three typical situations, and three ways to use this chapter.
Installing Langfuse for the first time on your own machine. Build the container map in Section 2.1, then follow Section 2.2, then Section 2.3, then Section 2.4: get the compose file, configure .env, start, verify, register, and create the key. The whole way is one command plus a few page clicks. You do not need a programming background.
You got stuck halfway through the install. web keeps restarting, curl returns 502, the initialization variables in .env never took effect, or the API key button will not click. We have stepped on all four of these pitfalls. Go straight to the troubleshooting records in Section 2.6 and match your case. Each record gives a path as phenomenon, then root cause, then fix.
It is already running, and you care about changing the port, backup, or upgrade. For a port change, see the plan in Section 2.3.3. Backup and upgrade (including the downgrade risk) are in Section 2.5. The port-conflict experience of running several stacks together is also in Section 2.3.3.
Prerequisite: a machine with Docker installed, including Docker Compose v2. The environment confirmed in testing for this book is a development machine on Windows 11 plus Docker Desktop. The official hardware list follows the self-hosting docs. Our recommendation: a machine with 8 GB of memory is enough to start with a Langfuse-only stack. If the same machine also has to run other stacks from the shelf (for example the instance in the ragflow book; see Chapter 10), budget memory from 16 GB up, and read the port-conflict experience in Section 2.3.3 first. At the concept level you only need the four capability surfaces from Chapter 1.
2.1 Overview: the deployment unit is six containers
Set down one stance that runs through this chapter: understand Langfuse as a family of containers that work together. A single-application picture does not match the deployment. After docker compose up -d, what you get is not "one Langfuse". It is two application containers plus four data containers:
UI traffic · ingest entry (OTel endpoint)"] --> W["langfuse-web
UI and API · :3000"] W -->|"enqueue ingest jobs"| R[("Redis 7
cache and task queue · :6379")] R -->|"background consume"| K["langfuse-worker
async ingest · :3030"] W --> PG[("PostgreSQL 17
transactional data · :5432")] K -->|"write observation data"| CH[("ClickHouse 26.3
trace / observation / score
:8123 HTTP · :9000 native")] W -.->|"raw events and media"| MO[("MinIO (S3-compatible)
:9090 API · :9091 console")] K -.-> MO G["langfuse-ai-gateway (optional, beta)
LLM gateway · :3031
unconfigured when there is no Service Key"] -.-> W
Architecture of a self-hosted Langfuse deployment with six containers (ports are the host-side ports; there is also an optional beta component, langfuse-ai-gateway)
A list of components and responsibilities (images and ports are checked against the compose file confirmed in testing on a local machine on 2026-11-08):
| Container | Image | Responsibility | Host port | Where the data lands (named volume) |
|---|---|---|---|---|
| langfuse-web | docker.langfuse.com/langfuse/langfuse (${LANGFUSE_IMAGE_TAG}) |
UI and API: login, pages, the public API, and the ingest entry (the OTel endpoint /api/public/otel/v1/traces) |
3000 | — |
| langfuse-worker | docker.langfuse.com/langfuse/langfuse-worker (the same tag) |
Asynchronous ingest: consume ingest jobs in the queue and write observation data | 127.0.0.1:3030 | — |
| postgres | postgres:17 |
Transactional data: relational data such as organizations, projects, and users | 127.0.0.1:5432 | langfuse_postgres_data |
| redis | redis:7 |
Cache and task queue (the official statement is that Redis or Valkey are both acceptable; the stack confirmed in testing for this book uses redis:7) | 127.0.0.1:6379 | langfuse_redis_data |
| clickhouse | clickhouse/clickhouse-server:26.3.62.3 |
Observation data: trace / observation / score | 127.0.0.1:8123 (HTTP) / 9000 (native) | langfuse_clickhouse_data + langfuse_clickhouse_logs |
| minio | cgr.dev/chainguard/minio |
S3-compatible object storage: raw events and media | 9090 (API) / 127.0.0.1:9091 (console) | langfuse_minio_data |
| langfuse-ai-gateway (optional, beta) | docker.langfuse.com/langfuse/ai-gateway (the same tag) |
LLM gateway. When no Service Key is configured it starts in an "未配置态" ("unconfigured state"), and inference requests return 503 | 3031 | — |
Three data flows make the figure and the table readable. The ingest flow of SDK instrumentation: the SDK sends an OTel payload to the public endpoint of web, web enqueues it in Redis, and the worker consumes it in the background and writes the data into ClickHouse. That is what "asynchronous ingest" means. Chapter 3 comes back to this flow when it covers flush(). Transactional data (the organization, project, account, and keys you create) lands in PostgreSQL. Raw events and media (the original ingest payload, images inside a trace, and so on) land in MinIO as object storage. When you troubleshoot, ask first "which kind of container should this data be in?", and the direction will be right.
About the dashed box in the figure: langfuse-ai-gateway is an optional beta component introduced in v4, an LLM gateway. Compose pulls it up along with the rest by default. When no Service Key is configured it sits in an "未配置态" ("unconfigured state") (inference requests return 503), and it does not affect the work of the other six containers. Model calls in our running example go through Zhipu's OpenAI-compatible endpoint, connected directly from the application side, and they do not depend on this gateway. Recording that it exists is enough.
Last, the security boundary. The comment at the head of the compose file is the official advice: bind every data container to 127.0.0.1 only, so it is unreachable from machines other than the host. Only three ports face outward: web (3000), MinIO (9090), and the gateway (3031). If you deploy on a host that several people can reach, also allow only these three ports at the host firewall, and replace every item on the secret list in Section 2.2.4.
The hands-on environment baseline of this book, stated here in passing. Version facts in this chapter and in later chapters are anchored to it:
| Item | Value | Verification date |
|---|---|---|
| Langfuse server | v4.76.0 (web, worker, and the gateway share one tag) | 2026-11-08 |
| Deployment form | Docker Compose on a local machine, six containers plus an optional gateway, all seven containers healthy | 2026-11-08 |
| Data-component versions | ClickHouse 26.3.62.3 · PostgreSQL 17 · Redis 7 · MinIO (the chainguard image) | 2026-11-08 |
| Host | A Windows 11 plus Docker Desktop development machine | 2026-11-08 |
| Python SDK (from Chapter 3) | langfuse 5.2.0 (requires a server ≥ 4.59.0) | 2026-11-08 |
This table also explains a choice this book makes: self-hosting is the foundation of our running example. The free tier of Langfuse Cloud can also be used for practice, but the hands-on chapters on the shelf (editing configuration, backing up volumes, locking a version, reading startup logs) can truly be touched only on your own machine. That is why this chapter exists.
2.2 Get the compose file and configure .env
2.2.1 Prerequisite check
docker --version          # Docker 24 and above is the steadier range
docker compose version    # Compose v2 is required (the docker compose subcommand form)
Reserve disk for a first image pull of 4-8 GB (Section 2.3.1 has the time expectation). Windows users: under the WSL2 backend of Docker Desktop, volumes and images both live inside the virtual machine, so the disk you leave on the host is growth room for the virtual disk.
2.2.2 Get the compose file
The official path is docker-compose.yml on the main branch of the repository (downloaded for this book on 2026-11-08, confirmed in testing; the repository path follows the main branch of langfuse/langfuse):
curl -O https://raw.githubusercontent.com/langfuse/langfuse/main/docker-compose.yml
You do not need to clone the whole repository. One compose file plus a .env you are about to write is the entire kit of the deployment. Give this stack its own working directory. Put .env in the same directory as the compose file, and run every docker compose command in that directory.
2.2.3 Image registry and the version-lock strategy
The images of the three Langfuse components in the compose file all come from the vendor's own registry docker.langfuse.com (and not from Docker Hub), and one variable locks the version of all of them:
image: docker.langfuse.com/langfuse/langfuse:${LANGFUSE_IMAGE_TAG:-4}
Note that the default is 4, a floating tag that follows updates inside the major version. The v4 release pace is 1-2 releases a day (the baseline of this book, v4.76.0, was released on 2026-11-05, and the deployment was verified on 2026-11-08). A floating tag means that one day a casual docker compose pull quietly swaps your instance to another version. For a book that has to produce observation data over a long time and also compare versions (Chapter 6 looks at Prompt versions, Chapter 8 looks at experiment comparisons), that is not acceptable. Our recommendation: lock a concrete version number explicitly in .env:
LANGFUSE_IMAGE_TAG=4.76.0
The comment at the head of the compose file has another reminder worth copying. web, worker, and the gateway must share one tag, and it must be newer than 4.75.0. An older web image hides the gateway even if the gateway's two keys are configured. The gateway image also has LANGFUSE_AI_GATEWAY_IMAGE_TAG, which can override it alone, and you need that only when some release is missing the gateway image.
The images of the four data containers come from their own official repositories (postgres, redis, clickhouse, and chainguard's minio). The version is written directly in the compose file, or a variable supplies a default (for example POSTGRES_VERSION defaults to 17). You do not need to worry about locking them.
2.2.4 The CHANGEME secret list
Every default in the compose file that is marked # CHANGEME must be overridden in .env. Those defaults (mysecret, mysalt, postgres, miniosecret, and so on) are there so that it "can start". They are not there so that it "can be used". The full list:
| Variable | Compose default | How to generate or set it |
|---|---|---|
NEXTAUTH_SECRET |
mysecret |
openssl rand -base64 32 |
SALT |
mysalt |
openssl rand -base64 32 |
ENCRYPTION_KEY |
64 0 characters |
openssl rand -hex 32 |
POSTGRES_PASSWORD |
postgres |
A random password |
DATABASE_URL |
postgresql://postgres:postgres@postgres:5432/postgres |
The password part must be the same value as POSTGRES_PASSWORD (see below) |
CLICKHOUSE_PASSWORD |
clickhouse |
A random password |
MINIO_ROOT_PASSWORD |
miniosecret |
A random password |
LANGFUSE_S3_EVENT_UPLOAD_SECRET_ACCESS_KEY |
miniosecret |
The same value as MINIO_ROOT_PASSWORD |
LANGFUSE_S3_MEDIA_UPLOAD_SECRET_ACCESS_KEY |
miniosecret |
The same value as MINIO_ROOT_PASSWORD |
LANGFUSE_S3_BATCH_EXPORT_SECRET_ACCESS_KEY |
miniosecret |
The same value as MINIO_ROOT_PASSWORD |
REDIS_AUTH |
myredissecret |
A random password |
NEXTAUTH_URL |
http://localhost:3000 |
The address used to reach it from outside. When you change the port, change this too (Section 2.3.3) |
Generating the secrets is three commands (Git Bash on Windows includes openssl; keep the generated values yourself, and do not put them in git):
openssl rand -base64 32   # one run each for NEXTAUTH_SECRET and SALT
openssl rand -hex 32      # ENCRYPTION_KEY
A .env skeleton you can copy directly (every password is a placeholder; do not write real values into any file that will be committed). Placeholders inside the fence stay in Chinese so the lines match the source. <随机口令> ("a random password"), <同 POSTGRES_PASSWORD> ("the same value as POSTGRES_PASSWORD"), <同 MINIO_ROOT_PASSWORD> ("the same value as MINIO_ROOT_PASSWORD"):
# .env — same directory as docker-compose.yml
LANGFUSE_IMAGE_TAG=4.76.0
NEXTAUTH_URL=http://localhost:3000

# Three secrets: generate with openssl rand
NEXTAUTH_SECRET=<openssl rand -base64 32>
SALT=<openssl rand -base64 32>
ENCRYPTION_KEY=<openssl rand -hex 32>

# Database: the two passwords must match — the pitfall in troubleshooting record #1 of this chapter
POSTGRES_PASSWORD=<随机口令>
DATABASE_URL=postgresql://postgres:<同 POSTGRES_PASSWORD>@postgres:5432/postgres

# Passwords for the other services, random and from the same approach
CLICKHOUSE_PASSWORD=<随机口令>
MINIO_ROOT_PASSWORD=<随机口令>
LANGFUSE_S3_EVENT_UPLOAD_SECRET_ACCESS_KEY=<同 MINIO_ROOT_PASSWORD>
LANGFUSE_S3_MEDIA_UPLOAD_SECRET_ACCESS_KEY=<同 MINIO_ROOT_PASSWORD>
LANGFUSE_S3_BATCH_EXPORT_SECRET_ACCESS_KEY=<同 MINIO_ROOT_PASSWORD>
REDIS_AUTH=<随机口令>

# Leave the INIT variables below empty on a first deploy — the scenario is in Section 2.4.4 and troubleshooting record #3
#LANGFUSE_INIT_ORG_ID=
#LANGFUSE_INIT_ORG_NAME=
#LANGFUSE_INIT_PROJECT_ID=
#LANGFUSE_INIT_PROJECT_NAME=
#LANGFUSE_INIT_PROJECT_PUBLIC_KEY=
#LANGFUSE_INIT_PROJECT_SECRET_KEY=
#LANGFUSE_INIT_USER_EMAIL=
#LANGFUSE_INIT_USER_NAME=
#LANGFUSE_INIT_USER_PASSWORD=
Why must DATABASE_URL and POSTGRES_PASSWORD be the same value? In the compose file, the postgres container initializes the database password with POSTGRES_PASSWORD, while web and worker connect to it with the full connection string DATABASE_URL. The default in both places is the placeholder password postgres. If you change only POSTGRES_PASSWORD in .env and do not write DATABASE_URL, the database uses the new password and the client brings the old password, and authentication fails. This is the first pitfall hit during deployment on a local machine (troubleshooting record #1). The symptom is that web does not come up, and the log reports a database authentication error (P1000).
One more emphasis on the three MinIO items. The three S3 *_SECRET_ACCESS_KEY values and MINIO_ROOT_PASSWORD are the same password appearing in four places. MinIO starts the service with the root password, and web and worker read and write buckets with the S3 key. When the two do not match, the ingest chain fails at the object-storage step.
2.2.5 A walk through the compose structure
First, a section map of the whole file. Five blocks, and each one is in charge of one thing:
| Block | Where | What it is in charge of | Do you touch it |
|---|---|---|---|
| Head comment | The top of the file | Security advice (allow only 3000, 9090, and 3031) and the gateway version reminder | Read only |
services: the two application containers |
langfuse-worker → langfuse-web → langfuse-ai-gateway |
Image, ports, environment variables, and dependencies | Usually leave it (changing the port is the exception, Section 2.3.3) |
services: the four data containers |
clickhouse → minio → redis → postgres |
Each image, healthcheck, and data-volume mount | Leave it |
volumes: |
The end of the file | Five named-volume declarations (developed in Section 2.5.1) | Leave it |
| Environment-variable anchor | The worker environment (&langfuse-worker-env) |
The whole configuration shared by web and worker | Leave it, and override it through .env |
Four ways of writing that are worth knowing, all of them in the file you just downloaded:
A YAML anchor shares environment variables. Compose first defines a complete set of environment variables on langfuse-worker (the anchor &langfuse-worker-env). langfuse-web inherits the whole set with the merge key <<: *langfuse-worker-env, then adds the parts that are its own (NEXTAUTH_SECRET, the INIT variables, the gateway variables, and so on). That explains one phenomenon: you will not find SALT in the web environment list, but it does take effect, inherited from the worker's anchor. When you edit .env, both sides stay in step. You do not edit two places.
Startup order is driven by health checks. The depends_on of web and worker carries conditions. The four dependencies, postgres, minio, redis, and clickhouse, must each pass their own healthcheck (pg_isready, mc ready local, redis-cli ping, and ClickHouse /ping) before startup. So after up -d, do not rush to open a browser. Look at the health verification in Section 2.3 first.
MinIO creates the bucket automatically. The minio container's start command does mkdir -p /data/langfuse before it starts the service. The langfuse bucket that ingest needs does not have to be created by hand.
restart: always. Every service carries this policy. After the host reboots, the stack comes back on its own when the Docker daemon comes up. That is friendly for a machine you keep on and expect to be ready at boot. It also means "the machine rebooted and Langfuse is gone" is usually not the problem. Look at docker compose ps first.
2.3 Start and health verification
2.3.1 Start
docker compose up -d
The first run is image-pull time, not startup time. The first pull of the full stack is about 4-8 GB (the two Langfuse images plus ClickHouse, Postgres, Redis, and MinIO; the basis confirmed in testing for this book, and the exact size varies with the version and the network). When bandwidth is ordinary, leave an expectation from a few minutes up to half an hour. After the pull finishes, the containers come up in order. Because of the health-check gate described in Section 2.2.5, web and worker wait until all four data containers are healthy before they start. A gap of a minute or two from up -d until web is actually reachable is normal.
What actually happens from the moment you press Enter until you can open a browser, split along a timeline:
| Stage | Rough duration | What happens | How to confirm it |
|---|---|---|---|
| Pull images | A few minutes up to half an hour (depends on bandwidth; the full stack is about 4-8 GB) | Pull the two Langfuse images, ClickHouse, Postgres, Redis, and MinIO in order | In docker compose ps, status moves from Created toward running |
| Data containers ready | Ten-plus seconds to a minute or two | The four data containers start and run their own healthchecks | In ps, the four become healthy one after another |
| Application containers start | A minute or two | web and worker start after the four dependencies are healthy. During web startup, database migrations run | Migration output in the web log, then the service listens on 3000 |
| Health check passes | A few seconds after migrations finish | /api/public/health can answer |
The curl in Section 2.3.2 returns status: OK |
Whichever stage is stuck, locate it in that stage. If images will not pull, look at the network and the proxy. If a data container is not healthy, look at its log. If web will not come up, think first of DATABASE_URL in record #1. Watch the ready state:
docker compose ps
All six containers (seven if you count the optional gateway) should be healthy or running. If one did not come up, or it keeps restarting, look at its log first:
docker compose logs -f langfuse-web
Log filtering is worth learning too. docker compose logs langfuse-web 2>&1 | grep -iE 'error|migrat' pulls out the migration lines and the error lines in one command. Of the four troubleshooting records in Section 2.6, three of them start their location from this sentence. What to look at in the log: during startup, look for "All migrations have been successfully applied" and the Ready mark right after it. During runtime, watch warn and error lines that keep appearing.
2.3.2 Health verification
After web is ready, verify it with the public health-check endpoint (this is the only authoritative criterion of "deployment complete"):
curl --noproxy '*' http://localhost:3000/api/public/health
Confirmed in testing on a local machine (2026-11-08, v4.76.0), the return is:
{"status":"OK","version":"4.76.0"}
The version number in the body matches the LANGFUSE_IMAGE_TAG you locked in .env. Check it once while you are there, and confirm that "lock the version" really locked it. Two reminders. First, --noproxy '*' is not decoration. When a system proxy is on, on a local machine, it is the remedy for a 502 (troubleshooting record #2). Second, open the browser only after the health check passes. Opening it early only shows a half-initialized state.
This section also gathers, in passing, a few compose commands you will use every day later:
| Command | What it does | When to use it |
|---|---|---|
docker compose ps |
See each container's status and health | The first step of every investigation |
docker compose logs -f langfuse-web |
Follow the log of one service | When a container keeps restarting, or a page looks wrong |
docker compose restart langfuse-web |
Restart a single service | After you change a .env variable that belongs to that service |
docker compose up -d |
Recreate the services that changed, from the current configuration | To make a change take effect after you edit .env or the compose file (the "restart" in most cases) |
docker compose down |
Stop the stack and remove containers (volumes are kept) | Free resources. The data stays |
docker compose down -v |
Stop the stack and delete the volumes with it | A dangerous operation. It is equivalent to wiping all data. This book does not recommend using it when you want to keep the data |
Note the right posture for "restart after editing .env". It is up -d, and it is not restart. restart does not reread the environment file. If you only restart after changing a variable, you will think "it did not take effect".
2.3.3 Port-conflict plan: if 3000 is taken, move to 3001
Port 3000 of web is the one most easily taken. Other Node development services running on a local machine, or another stack from the shelf, can all collide with it. Change two places together.
First, change the port mapping of langfuse-web in the compose file to the next port:
  langfuse-web:
    ports:
      - 3001:3000     # was 3000:3000; inside the container it is still 3000, and only the host-side port changes
Second, change the external address in .env to match:
NEXTAUTH_URL=http://localhost:3001
These two places move together. The port mapping decides which port the browser uses. NEXTAUTH_URL is the external address the application "knows about itself". Project links generated in the UI, and the host the SDK uses, both follow it. If you change only the mapping and not NEXTAUTH_URL, the page opens, but the links inside it still point at the old port. If you change only NEXTAUTH_URL and not the mapping, you cannot reach it at all. After the change, docker compose up -d restarts it into effect, and run the health check again at http://localhost:3001/api/public/health.
Running several stacks together is another kind of conflict. Three of them were hit in testing for this book, so they are named here in advance. On Windows there is a set of port ranges reserved by the system (Hyper-V dynamic reservation). A port mapping that falls inside one fails quietly or errors on bind. netsh int ipv4 show excludedportrange protocol=tcp lists the reserved ranges (a general command). When a ragflow stack runs on the same machine, its Kvrocks default of 6379 collides with Langfuse's Redis, and its MinIO 9000 collides with ClickHouse's 9000. Give way on the side that was installed later (the practice in this book: on the ragflow side, change them to 16379 and 19000). One sentence of principle: keep a list on each machine of who holds which port. When there is a conflict, change .env or an override file, and do not change the port meaning of the main compose file.
2.4 Initialization: from registration to the API key
Once deployment verification has passed, the next five minutes finish initialization in the browser. Every UI fact in this section comes from hands-on checks of v4.76.0 on 2026-11-08. The screenshots were taken the same day. First, lay the whole flow out as one overview table. The four sections after it expand the steps:
| Step | Page | Action | Output |
|---|---|---|---|
| ① | /auth/sign-in → Sign up |
Fill in Name, Email, and Password and register | The administrator account |
| ② | /onboarding |
On the subscription promotion page, click Skip | (none) |
| ③ | The Organizations home page | New Organization, then the organization name, then the project name on the same page | Organization yubing-org plus project after-sales |
| ④ | The project Traces page | Confirm that you land on an empty list (waiting for the first trace in Chapter 3) | A usable project space |
| ⑤ | Project Settings → API Keys | Create new API keys, fill in Name, and create | One chance each to see pk-lf- and sk-lf- |
2.4.1 Register the first account
Open http://localhost:3000 in a browser. The first visit jumps to the sign-in page /auth/sign-in. This screenshot was taken on 2026-11-08, before registration. The account does not exist yet, and the bottom of the card still has the Sign up entry:
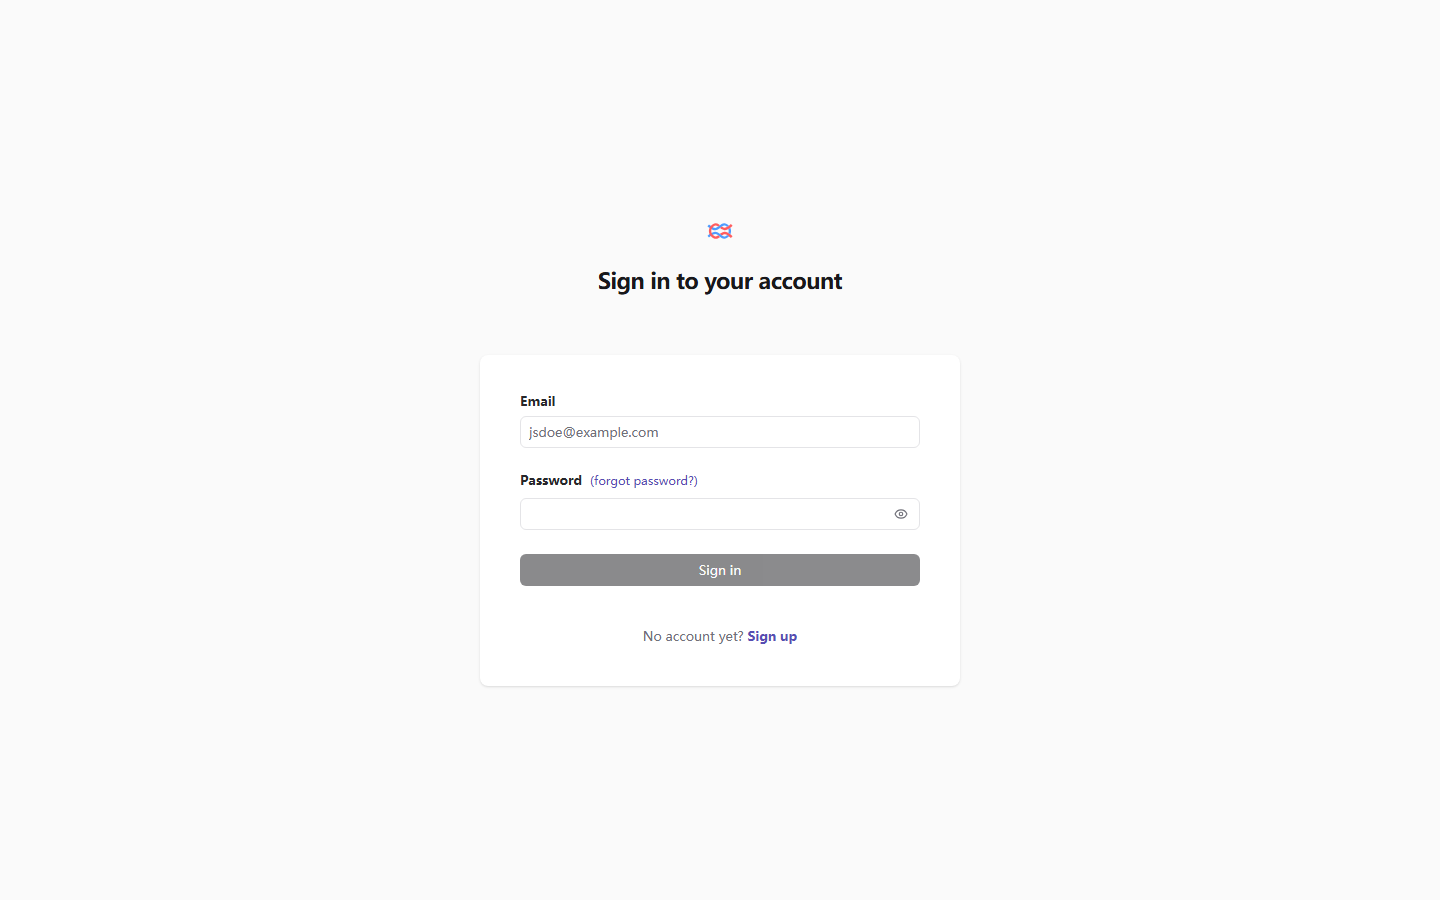
The sign-in page itself is plain: Email, Password, and a forgot-password link. At this moment the Sign in button is gray (there are no credentials to fill in yet). The path you take is the line at the bottom, "No account yet? Sign up". The correct path on a first deployment is to register the first account from here. Do not try to create the account "预先" ("in advance") with environment variables (why is in Section 2.4.4 and troubleshooting record #3).
Open Sign up, and you are on the registration page:
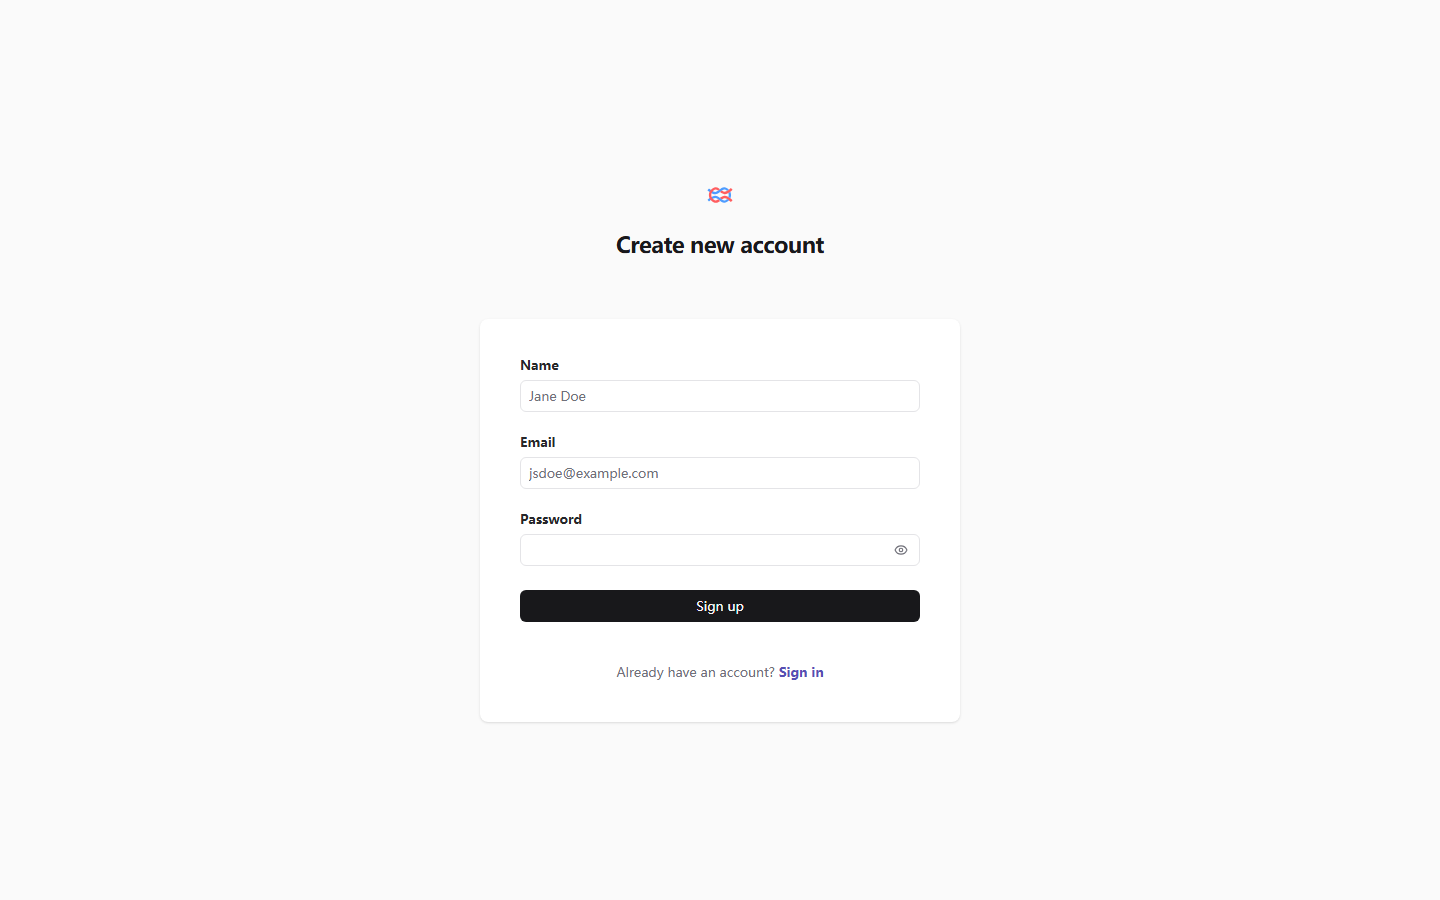
The registration page has three fields: Name (the display name in the UI), Email, and Password. Landed on our running example: the administrator in this book is yubing@local.dev (the password does not go into the manuscript, and it should not go into any file that will be committed). Fill them in and click Sign up, and registration is done. What registration creates is the account. Next you pass a subscription promotion page (onboarding, /onboarding). Click Skip, and it does not affect the functions.
2.4.2 Create the organization and the project
The home page after login is the organization list. The list is still empty at this moment, and the page gives you a Get Started card:
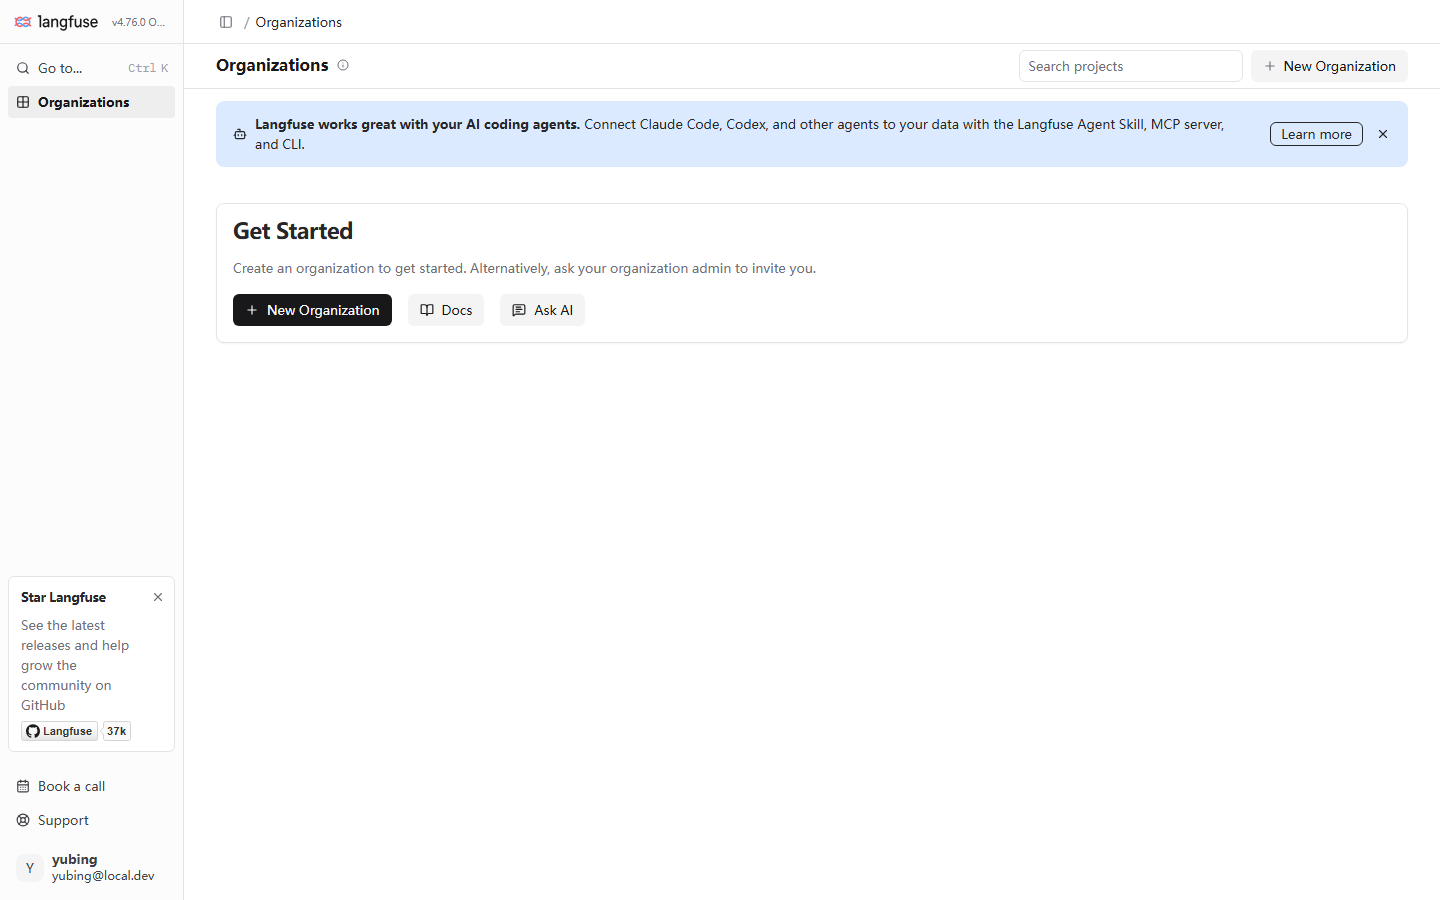
Three pieces of information are worth noticing. First, the home page is the organization list. Langfuse's resource model is two levels, organization then project (developed in Chapter 11), and all of your data hangs under this hierarchy. Second, there are two entries: New Organization at the upper right and New Organization inside the card are the same action. Third, the blue banner at the top is selling you AI coding agents integration (agents such as Claude Code and Codex connected through MCP). It has nothing to do with this book. Close it.
Click New Organization, and you enter the /setup page. First name the organization (this book uses yubing-org). On the same page, next create the project (this book uses after-sales). When the two steps are done, the page lands on the Traces page of the project after-sales, an empty list waiting for the first trace in Chapter 3 to fill it.
2.4.3 Create an API key
The project is created. Go and get the integration credentials. Enter project Settings → API Keys:
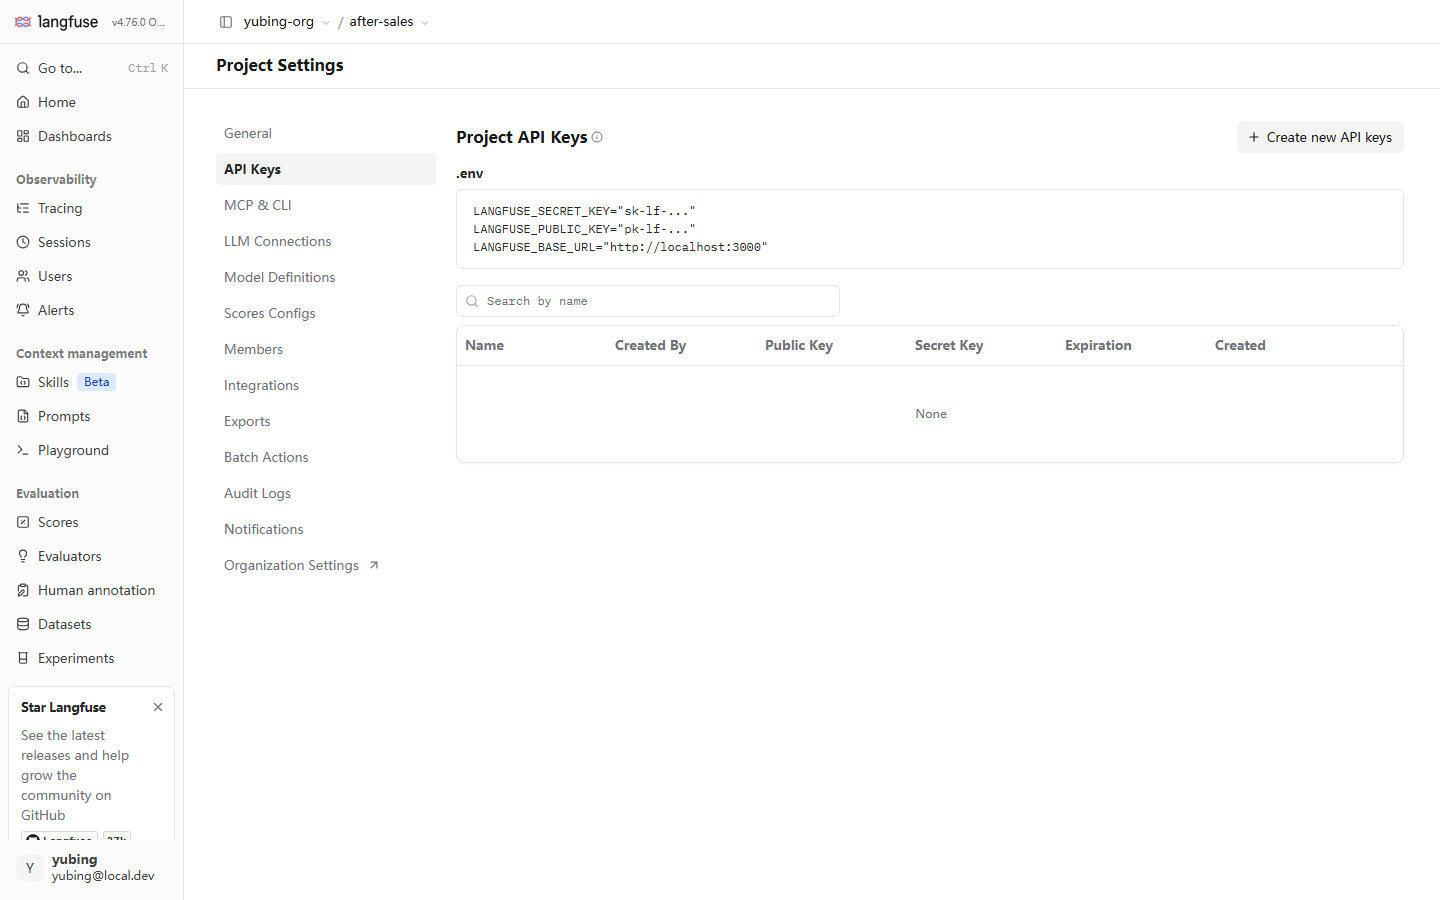
The information density of this page is not small. Take it apart. The .env code block gives the triple template the SDK needs: LANGFUSE_SECRET_KEY, LANGFUSE_PUBLIC_KEY, and LANGFUSE_BASE_URL. The demo application in Chapter 3 injects these three variables. The six table columns (Name, Created By, Public Key, Secret Key, Expiration, and Created) are empty at this moment. Get familiar with the Settings sidebar on the left while you are here. Model Definitions is where Chapter 5 sets model prices. Members manages members (Chapter 11). MCP & CLI, LLM Connections, and the rest are places to come back to when this book uses them.
Click Create new API keys at the upper right, and the create dialog opens:
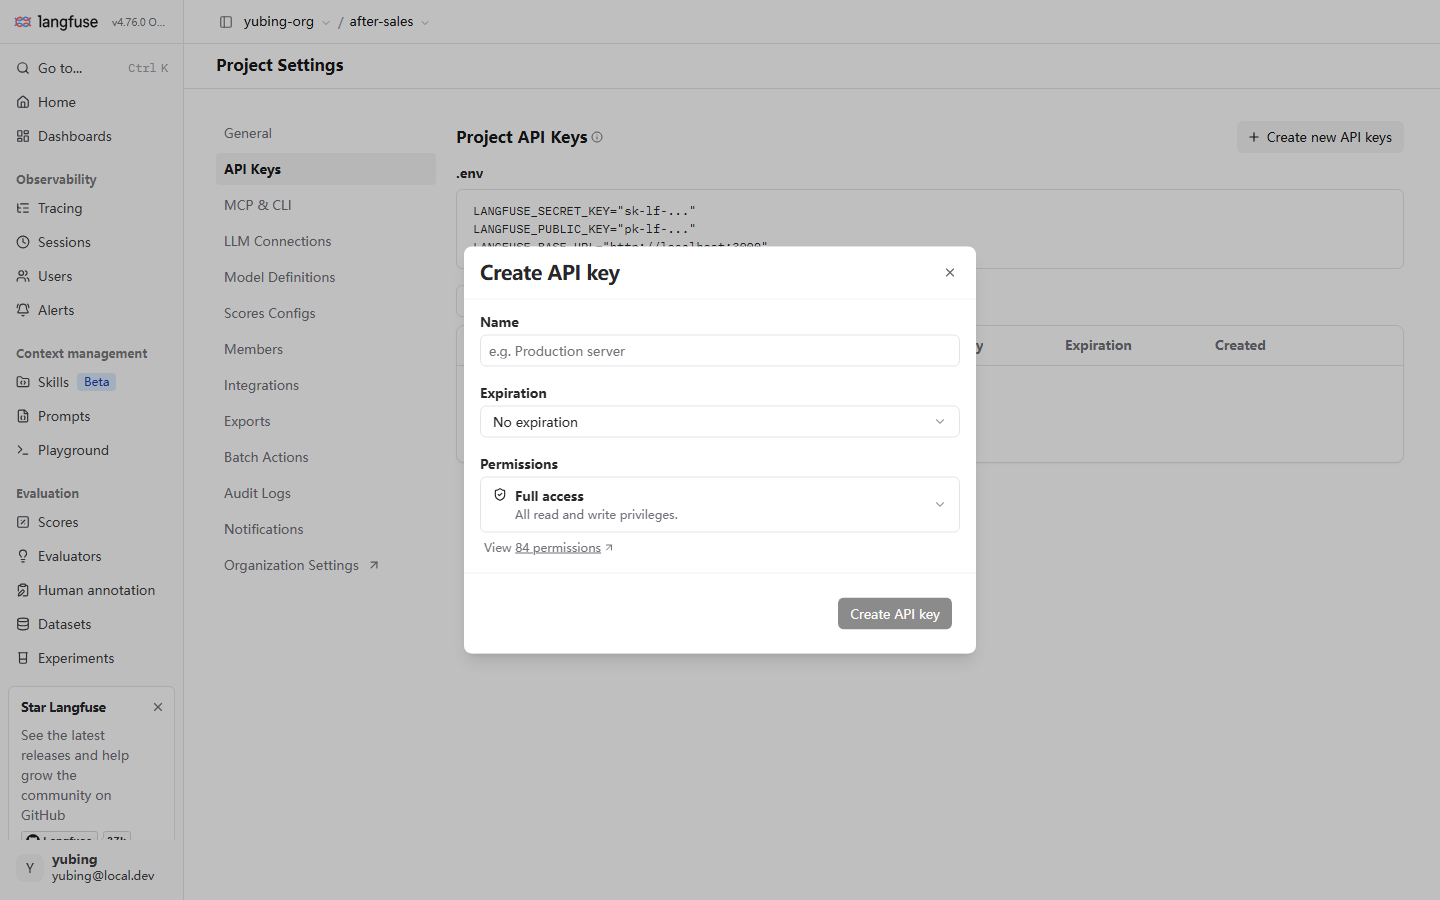
The dialog has three items. Name is required. When it is empty, the Create API key button at the bottom stays gray and disabled. This is not a failure. It is a guard against a blank name (troubleshooting record #4). Expiration defaults to No expiration (a local instance can keep the default; a production instance should give the key an expiry). Permissions defaults to Full access (the UI attaches a "View 84 permissions" link that expands the detail). After you fill in Name (for example local-dev), the button lights up. Click create. The critical minute is here: the public key that starts with pk-lf- and the secret key that starts with sk-lf- are shown in full only in this one dialog. Close it, and you can never get them again. On the spot, put both values, together with the Base URL, into your .env (or a secrets manager), and then close the dialog. A lost sk has no "find it again". It only has "revoke and create again".
Landed on our running example, the three variables the Chapter 3 demo application has to inject are these (the values are placeholders; replace them with the real values you just received):
# Environment variables on the demo application side (not the .env of the Langfuse stack)
LANGFUSE_PUBLIC_KEY=pk-lf-...
LANGFUSE_SECRET_KEY=sk-lf-...
LANGFUSE_BASE_URL=http://localhost:3000
The scope of a key is the project. pk-lf- and sk-lf- take effect only for the project after-sales. Chapter 11 comes back to this point when it covers isolation across projects. Another usage rule: the sk is equivalent to a password for all read and write permissions inside this project. Do not put it in git, and do not let it appear in screenshots or logs. Every demo in this book reads it from an environment variable.
2.4.4 The scenario where LANGFUSE_INIT_* applies
The group of commented-out LANGFUSE_INIT_* variables in the .env skeleton (nine in all: user, organization, project, and key) looks like a shortcut that "skips the UI and initializes from environment variables". It has one hard prerequisite: LANGFUSE_INIT_ORG_ID must point at an organization that already exists. On a first deployment the database does not yet contain any organization. Without an organization ID, the whole set of INIT variables is ignored (the startup log has a warn), and none of the initial user or initial project you set in .env appears. That is what testing for this book confirmed (troubleshooting record #3).
So the scenario where it applies has to be stated clearly. A first deployment goes through UI registration (Sections 2.4.1–2.4.3 are the whole flow, five minutes). The INIT variables are left for the automation scenario of "initialize into an organization that already exists". For example, you rebuilt an environment and you want startup to pour the project and the key straight into an organization that already exists. Get the organization ID first, then fill in the variables. Treating INIT as the way to create the account on a first deployment is the most common misuse.
2.5 Data persistence, backup, and upgrade
2.5.1 Five named volumes
docker compose down does not delete volumes. docker compose down -v does, and deleting them is equivalent to wiping all data. The correspondence between the five named volumes and the data:
| Named volume | What it holds | Container |
|---|---|---|
langfuse_postgres_data |
Transactional data: organizations, projects, users, and keys | postgres |
langfuse_clickhouse_data |
Observation data: trace / observation / score | clickhouse |
langfuse_clickhouse_logs |
ClickHouse service logs | clickhouse |
langfuse_minio_data |
Raw events and media (object storage) | minio |
langfuse_redis_data |
Queue and cache state | redis |
The three kinds of data (transactional, observation, and raw events) land in three volumes, matching the three-way split of data in Section 2.1 one for one. The volumes are the entire belongings of this deployment. Containers can be deleted and recreated at any time. If a volume is gone, you start over (observation data can of course be ingested again by the application, but the historical traces, Prompt versions, and datasets are gone).
2.5.2 Backup points
Two paths, chosen by how much downtime you can tolerate. Logical backup: Postgres exports transactional data with pg_dump, and observation data can use ClickHouse's export means. Volume snapshot: after docker compose down, pack the whole volume (volumes live under the Docker data directory on the host), then come back with up -d. Our recommendation for a local instance, as a minimum: there must be a backup before an upgrade (the next section explains why immediately). At other times, set your own pace by how important the data is. When Chapter 12 covers quality gates, the datasets and experiment results used for regression are in this set of volumes. If they are lost, your regression baseline is lost.
The smallest practical logical backup (a demonstration of the approach; the command shape follows your actual environment). Export one copy from each of the two most important data containers, and stay off the business peak. The placeholder <口令> ("password") inside the fence is kept as in the source.
# Transactional data: pg_dump exports SQL text
docker exec langfuse-local-postgres-1 \
  pg_dump -U postgres postgres > backup-postgres-$(date +%F).sql

# Observation data: ClickHouse exports tables and data with clickhouse-client
docker exec langfuse-local-clickhouse-1 \
  clickhouse-client --user clickhouse --password '<口令>' \
  -q "SHOW TABLES FROM default"          # list the tables first
docker exec langfuse-local-clickhouse-1 \
  clickhouse-client --user clickhouse --password '<口令>' \
  -q "BACKUP TABLE default.traces TO '/tmp/traces.zip'"
Two reminders about the basis. First, the target path of ClickHouse BACKUP is on the filesystem inside the container. After the export, docker cp it out. Second, the volume of observation data grows with use, and the pace of a full backup has to follow the amount of data. A local instance can start from "before an upgrade, plus weekly". A production scenario is counted separately. The full flow of a restore drill and of checking that the backup is usable is not developed in this chapter. The simplest check for a local instance is: the export file is non-empty, and it can be imported again and queried successfully. One last rule: keep backup files apart from the deployment stack. A volume snapshot left on a local machine does not count as a real backup. At least one export should land on another disk or another machine.
2.5.3 Upgrade and the downgrade risk
The upgrade action itself is light. Change LANGFUSE_IMAGE_TAG in .env to the target version, then:
docker compose pull
docker compose up -d
You do not run the database-structure upgrade (the migration) by hand. The new-version container finishes it automatically at startup. The evidence is in troubleshooting record #1. That authentication failure (P1000) happened during the migration step of startup, which shows that migration is part of the container startup flow. That also explains one behavior of an upgrade. After the first up -d of a new version, you wait for the migration to finish before the service is ready. Waiting a bit longer than usual is normal.
Two strategy reminders. First, you do not have to chase every new release. v4 ships 1-2 releases a day, and following the daily releases turns the instance into an upgrade test field. The practice in this book is to lock a concrete version (Section 2.2.3), upgrade when you need to, and read that version's release notes before the upgrade. Second, downgrade has risk. A migration is one-way. After the database structure has been upgraded, swapping the tag straight back to an old version may fail to start because the structure does not match. Once a problem shows up after an upgrade, the right move is not a downgrade. It is a rollback to the backup taken before the upgrade in Section 2.5.2 (restore the volumes, and recreate with the old tag). That is where "there must be a backup before an upgrade" comes from.
A one-minute inspection after the upgrade, to close it out. docker compose ps shows seven healthy containers. curl --noproxy '*' http://localhost:3000/api/public/health returns the new version number. After you log in, the version badge on the home page matches what you expected. When those three steps are done, the upgrade loop is closed. If your instance is configured with a migration-period variable such as LANGFUSE_MIGRATION_V4_WRITE_MODE (the joint hands-on check in Chapter 10 uses it), remember to check, at upgrade time, whether its meaning has changed in the new version.
2.6 Troubleshooting records
All four records below come from the real process of deploying v4.76.0 on a local machine on 2026-11-08. Each one is written in three parts: phenomenon, then root cause, then fix. Before you match your case, confirm the basic investigation posture. docker compose ps shows which container is unhealthy. docker compose logs <service name> shows its log. Three of the four records were located with these two commands.
Record #1: web does not come up, and the log reports a database authentication failure (P1000)
Phenomenon. After docker compose up -d, the four data containers become healthy one after another, and only langfuse-web keeps restarting. The log shows a database authentication failure (error code P1000), and the migration flow cannot continue.
Root cause. DATABASE_URL in the compose file has the default postgresql://postgres:postgres@postgres:5432/postgres, while .env set only a random value for POSTGRES_PASSWORD. The postgres container initializes with the random password, and web connects with the compose default password. The two variables do not match, and authentication must fail. This is exactly the pitfall that Section 2.2.4 stresses must be the same value. The default is a placeholder. Changing half of it is the same as not changing it.
Fix. Write the full connection string explicitly in .env, with the password part the same value as POSTGRES_PASSWORD. The placeholder in the fence is kept as in the source. <与 POSTGRES_PASSWORD 同值> ("the same value as POSTGRES_PASSWORD").
DATABASE_URL=postgresql://postgres:<与 POSTGRES_PASSWORD 同值>@postgres:5432/postgres
After the change, docker compose up -d recreates web (the worker that depends on it is recreated along with it). In the log, the migration runs normally, and web becomes healthy.
Record #2: the stack is healthy, but curl returns 502
Phenomenon. All seven containers are healthy, and the browser can open the UI, but curl http://localhost:3000/api/public/health returns 502. The Python SDK connecting to Langfuse on a local machine cannot connect either.
Root cause. HTTP_PROXY and HTTPS_PROXY system-proxy environment variables were set on a local machine. curl and most HTTP clients do not exempt localhost on their own. A request to localhost:3000 is sent to the proxy server. The proxy does not come back to the port on a local machine, and you get a 502. The stack itself has no problem. The verification tool was hijacked by the proxy.
Fix. Verification and local debugging go around the proxy:
curl --noproxy '*' http://localhost:3000/api/public/health
On the Python side, set NO_PROXY=localhost. For browser automation (for example Playwright), add --no-proxy-server to the launch arguments. The environment of every demo script in this book carries this exemption. From Chapter 3 on, you will see it again and again.
Record #3: the whole LANGFUSE_INIT_* set is ignored
Phenomenon. .env was filled in with the full set of LANGFUSE_INIT_USER_EMAIL, LANGFUSE_INIT_ORG_NAME, and LANGFUSE_INIT_PROJECT_*, in the hope that startup would create the account and the organization automatically. After it came up, the log had a warn, and the UI had neither that account nor that organization.
Root cause. The INIT variables require LANGFUSE_INIT_ORG_ID to point at an organization that already exists. On a first deployment the database does not yet have an organization. The organization ID is missing, and the whole set of INIT variables is ignored as a whole. This is not a variable written wrong. The prerequisite is not met (Section 2.4.4 already develops it).
Fix. A first deployment goes through UI registration (Sections 2.4.1–2.4.3): register the first account, create the organization and the project, and create the API key. It is five minutes of work, and there is no need for a shortcut. The INIT variables are left for the automation scenario of "initialize a project into an organization that already exists": get the organization ID in the UI or through the API first, then fill in the variables and rebuild the environment.
Record #4: the Create API key button is gray and will not click
Phenomenon. Project Settings → API Keys → Create new API keys. After the dialog opens, the Create API key button at the bottom is gray and disabled, and clicking it does nothing.
Root cause. Name in the dialog is required. When it is empty, the button stays disabled. It is a guard in the UI, and it is not a deployment problem. Compare it with the screenshot in Section 2.4.3: when the Name field is empty, the button is gray.
Fix. Fill in Name first (for example local-dev), and the button lights up. Leave Expiration and Permissions at the defaults (No expiration and Full access), and you can create the key. One hands-on note, in passing, for people who script this step: when you automate this step with a tool such as Playwright, matching the button by UI role is occasionally unstable. Locating the click directly by DOM text is the most reliable.
Chapter summary
- The deployment unit is six containers. Two application containers, web (UI and API, 3000) and worker (asynchronous ingest, 3030), and four data containers, Postgres (transactional data), Redis (cache and queue), ClickHouse (observation data), and MinIO (raw events and media). There is also an optional beta langfuse-ai-gateway (3031). With no key it is unconfigured, and it does not affect the rest. Each of the three kinds of data lands where it belongs. Troubleshooting starts by asking where this data should be.
- Lock the version, and replace the secrets.
LANGFUSE_IMAGE_TAGlocks a concrete version number (v4 ships 1-2 releases a day, and a floating tag is an upgrade left to chance). Override everyCHANGEMEitem in the compose file from.env. Generate the three secrets withopenssl rand. DATABASE_URLandPOSTGRES_PASSWORDmust be the same value. That is the first pitfall of deployment (record #1). The MinIO password appears in four variables, and the four places match.- The health check is the only authoritative criterion. The deployment is complete only when
GET /api/public/healthreturns{"status":"OK","version":"…"}. When a proxy is present on a local machine, add--noproxy '*'to curl (record #2). The first image pull is 4-8 GB. Leave room for that expectation. - The initialization path of a first deployment is UI registration. Sign up, Skip the subscription page, New Organization to create the organization and the project, then Settings, then API Keys.
pk-lf-andsk-lf-are shown only once. Write them down on the spot. The INIT variables need an organization ID that already exists. They are a tool for "initialize into an organization that already exists", and they are not a shortcut for a first deployment (record #3). - The volumes are the entire belongings. Five named volumes correspond to the three kinds of data. An upgrade is: change the tag, pull, and restart. The migration runs automatically at startup. A migration is one-way, and the right move for a downgrade is to roll back the backup taken before the upgrade. That is why there must be a backup before an upgrade.
Next step: take the three variables from Section 2.4.3 (LANGFUSE_PUBLIC_KEY, LANGFUSE_SECRET_KEY, and LANGFUSE_BASE_URL) into Chapter 3, install the Python SDK on "售后助手" ("After-sales Assistant"), and send the first trace.
Acceptance checklist
By the time you reach here, you should be able to:
- ☐ Finish one six-container deployment:
docker compose psis all healthy, and/api/public/healthreturnsstatus: OKwith a version number that matches the tag you locked. - ☐ State the responsibility of each of the six containers, and say which container and which named volume hold transactional data, observation data, and raw events.
- ☐ Generate the three secrets with
openssl rand, and explain whyDATABASE_URLandPOSTGRES_PASSWORDmust be the same value (against the phenomenon and the root cause of record #1). - ☐ Walk the whole flow from registration to the API key, and say what requirement the fact that
sk-lf-is shown only once places on the order of your actions. - ☐ State the prerequisite for
LANGFUSE_INIT_*to take effect (an organization ID that already exists) and the scenario it is actually for. - ☐ Finish one port move: when 3000 is taken, move web to 3001, land both changes (the mapping and
NEXTAUTH_URL) together, and pass the health check again. - ☐ When localhost returns 502, check the proxy before you check the stack (the reflex from record #2).
Further reading
- Chapter 3 (Quick start): the first consumer of this chapter's API-key triple. SDK installation, injecting the three variables, and a ten-minute chain to the first trace. The
--noproxyexemption shows up there again. - Chapter 5 (Cost and performance monitoring): Model Definitions in the Settings sidebar of this chapter's screenshot is where you set a price for a model that is outside the built-in price table, such as glm-5.3-flash.
- Chapter 11 (Multiple projects and team management): the setup planted when you create the organization in Section 2.4.2. The systematic development of the organization and project levels, member roles, and API-key scope.
- Chapter 12 (Prompt regression and quality gates): the final explanation of why the backup in Section 2.5.2 matters. The regression baseline (datasets and experiment results) lives in this set of volumes.
- The official self-hosting docs (langfuse.com/docs, the self-hosting section): this chapter's
sourcepoints at that entry page. The full list of configuration variables, and the production-deployment path (Kubernetes and Helm), follow the official docs. This chapter covers only the path that the local-deployment hands-on check actually walked.
Review checklist (before publication)
- [x] The six-container responsibilities, ports, volumes, the CHANGEME list, and the INIT variable list were each checked against the compose file on a local machine (the official main branch, downloaded 2026-11-08).
- [x] The health-check response body, the full UI flow from registration to the API key, and the four troubleshooting records all come from hands-on checks of v4.76.0 on a local machine on 2026-11-08 (DEPLOY.md troubleshooting records #1–#4). The five screenshots were taken the same day.
- [ ] The first image pull of "4-8 GB" is the basis of a single observation on a local machine. It varies with the version and with the registry network. Recheck it against the version at review time.
- [ ] The two linked changes for moving the port to 3001 (the mapping plus
NEXTAUTH_URL) were written from the compose defaults and from how the application builds links. The 3001 scenario was not actually carried out on a local machine. A hands-on check can be added at review time. - [ ] The behavior of an upgrade (change the tag and restart) and of the migration running automatically at startup was summarized from the compose structure and from the startup-time migration phenomenon in record #1. No cross-version upgrade drill was done on a local machine. Add a hands-on check when Chapter 12 moves this toward production.